Thursday, 23 June 2011
this week
we graduated on 22/06/2011 i haven't got a finished product photo yet because we got kicked outta the computer suite so we couldn't update this blog stuff and any other assessments.
last week
 here we are putting insulation in the spaces and then putting gib up

then putting up the tin stuff and screw it on
this picture is what we are upto now putting battens on the back wall
Wednesday, 22 June 2011
last week


here we are getting ready for
our rafters and purlins.
in the next picture
here is me and ra putting nogs
in the end of the wing wall.

Wednesday, 25 May 2011
At m.i.t
 we are nailing our floor down and then we can put up our walls, on the edge its 150mm. going up the floor is 200mm. after this we put up our walls as you can see in the next picture.
 we are moving our frames to our sleep outs then we level it all up the with the sidewalls the put up our front frame then we nail it temporary.
 Wednesday, 4 May 2011
2/05/11
 On monday the 2 of May it was raining and we went into the the workshop to make a BBQ table, which didnt take long. we went into to groups of 3-4 and made different parts to our a BBQ table. my group was in charge for the bracing parts, in this picture we are cutting the small the braces that go underneith the top plate. then we go and get the wood for the runners and cut the angles. then we realized the runners were to short so we decieded to make longer ones.
here in this picture we are drilling the bolt holes. then we put the bolts through then we sorted out 180 mm each side of the seat and the top planks, then we put it on like the picture below.

Wednesday, 23 March 2011
21/03/11

Monday, 21 March 2011
Work Experience at royal oak intermediate

my 2nd day, i went out to the field to move some bark round the trees at the back fence. which took til after lunch.i did that til there was enough bark at the back fence.
Monday, 28 February 2011
Week 3
On 28/02/11 we have been talking about the sleepout we are building for six months. I have learned how to look at a plan properly, The sleepout we are building is 3m by 3m its cost is about $10,000.
 I learned what the safety features on the circular saw they are; Always use safety goggles and hearing protection, and don't wear loose clothes and jewelry. Depending on what you're cutting, you may also need a respirator or dust mask. And, remember, a circular saw is not a substitute for a chain saw, and as with any saw, you need to install the proper blade for your specific cutting task.
 Biscuit Cutter; Prepare yourself to use this tool by putting on safety goggles and glasses, along with a full face shield. If you have long hair, tie it back or tuck it under your hat. Likewise, avoid wearing loose clothes and jewelry. Further, take care to roll up your long sleeves above your elbows. It will be better to wear dust mask and non-slip footwear. How to use the biscuit cutter; Let me start out with a brief explanation of what biscuit joinery is, a biscuit, in this context, is a small oval piece of wood about 1/8 inch thick and comes in varying lengths. Of course you will need a biscuit joiner as well, this is a power tool that has a small circular saw blade that cuts into the edge of a piece of wood to the proper depth and shape to accept the biscuit.
After lunch we got our tools, we had to sharpen the chisels on the grinder which was a bit hard. You have to sharpen your chisels because they just came from the factory so they arent that sharp.

 Biscuit Cutter; Prepare yourself to use this tool by putting on safety goggles and glasses, along with a full face shield. If you have long hair, tie it back or tuck it under your hat. Likewise, avoid wearing loose clothes and jewelry. Further, take care to roll up your long sleeves above your elbows. It will be better to wear dust mask and non-slip footwear. How to use the biscuit cutter; Let me start out with a brief explanation of what biscuit joinery is, a biscuit, in this context, is a small oval piece of wood about 1/8 inch thick and comes in varying lengths. Of course you will need a biscuit joiner as well, this is a power tool that has a small circular saw blade that cuts into the edge of a piece of wood to the proper depth and shape to accept the biscuit.
 Friday, 25 February 2011
Week 2
This week at MIT we have been doing halving joints, stopped halving joints, half dove tail joints and dove tail joints.
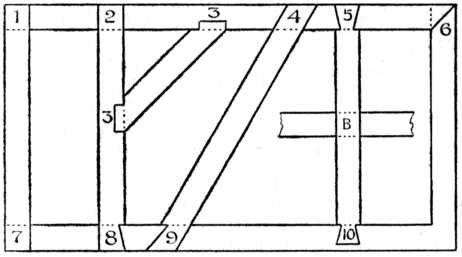
This is a diagram of different joint types.

This is a diagram of different joint types.
- Halving joint.
- Halved T joint.
- Angled half lap.
- Angled halving joint.
- Dove tail.
- Mitre halving joint.
- Halved joint with double dovetail.
- Half dove tail.
- Oblique dovetail halving joint.
- Stopped dovetail joint.
 Halving Joints: This a halving joint, First step is to mark it out, then you cut the half the side down to TW(timber width). Next you cut the top down to the saw mark which you already made. Then that part you made is the top part. Then you do this process again to the other piece.


- Dovetail joint: this is a dovetail joint, First step is mark it out, Then you cut the half of the TD (timber depth). Once you have done that you have to get a chisel to make a mark for the saw to cut the angle for the dovetail. Next the other piece you have to mark it out with the piece you made, Then you cut the angled lines first then you cut 5mms after the angled cut.Then you chisel the rest off then the picecs should fit.
Monday, 21 February 2011
Introduction
Hey people Im Reece Piper, I attended Onehunga High School for 2 years and a bit. Then I studied at MIT South Campass studying TRADESUP.
Subscribe to:
Comments (Atom)
